How to use a RTK GNSS Receiver for Android: A Step-by-Step Guide

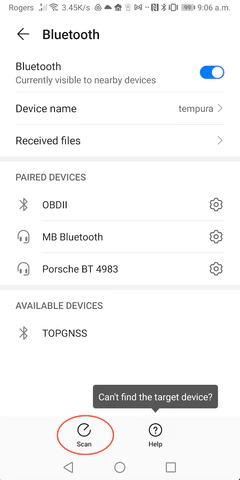
- On your Android device, navigate to Settings, then select Device Connection, followed by Bluetooth. Look for the option labeled Available Devices, where you should find your Bluetooth GNSS receiver. In case it’s not visible, try scanning for the device.
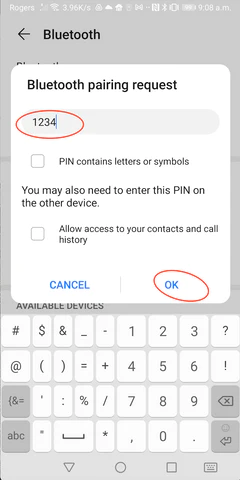
2. Simply tap on the GNSS receiver (labeled as “TOPGNSS” in the screenshot below) from the list of available devices. This action will trigger a Bluetooth pairing request. Enter the PIN code as “1234” and tap the “ok” button to proceed.
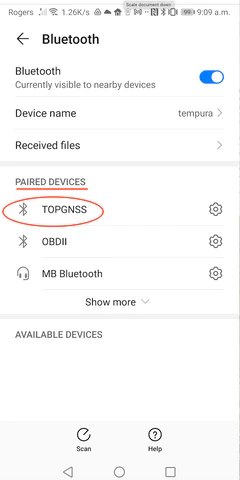
3. Your Android device has successfully paired with the GNSS receiver (identified as “TOPGNSS” in the screenshot below).
Section B:
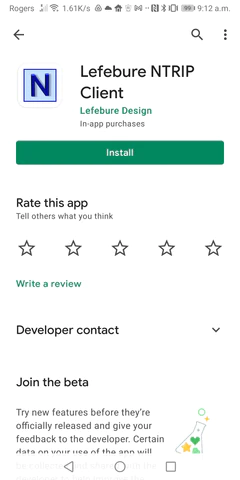
Install NTRIP Client. (step 4)
4. Head over to the Google Play Store on your Android device and install the “Lefebure NTRIP Client” app.
Section C:
To enable the sharing of location data from the RTK GNSS receiver with other apps on your Android device, utilize the “Lefebure NTRIP Client” as the mock location app. Follow steps 5-6 for this process.
5. To access the mock location settings on your Android device, follow these steps:
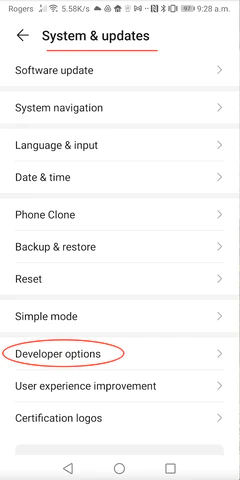
- From the main screen of your Android device, go to Settings.
- Navigate to System & Update.
- Look for Developer options and select it.
- Within the Developer options menu, find the Debugging section.
- Locate the option labeled “Select mock location app” and tap on it.
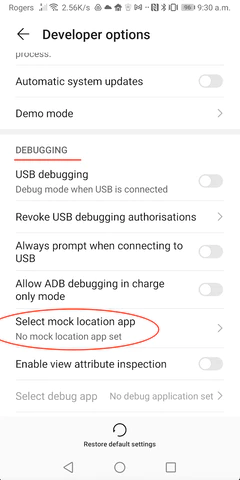
By default, the “Developer options” menu is hidden on your Android device. To make it visible, follow these steps:
- Go to Settings on your device.
- Navigate to About Phone.
- Look for the “Build Number” option and tap on it seven times.
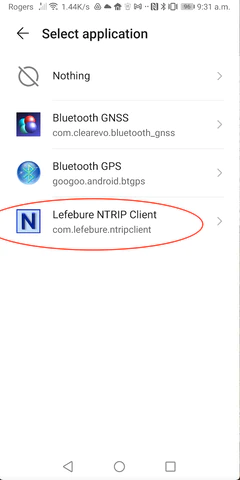
6. Select the “Lefebure NTRIP Client” app.
Section D:
Config the Lefebure NTRIP Client. (Step 7 – 16)
7. Open the “Lefebure NTRIP Client” app and tap on the “gear” icon to access its settings.
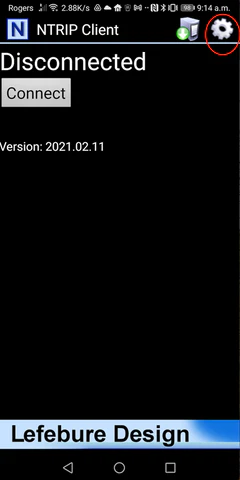
8. Select “Receiver Settings”.
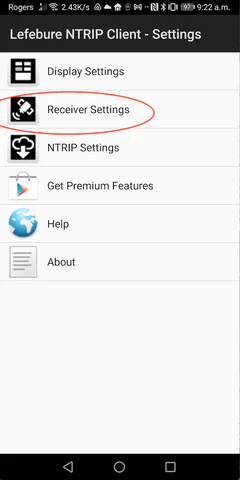
9. Select “Receiver connection”.
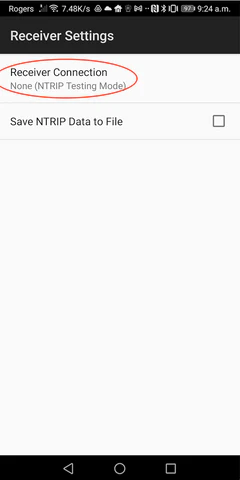
10. Select”External via Bluetooth”.
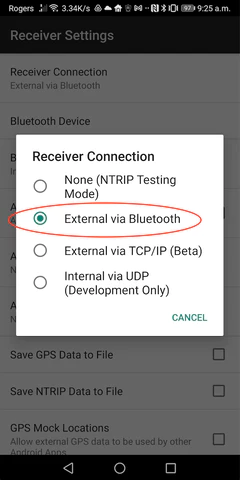
11. Select “TOPGNSS”.
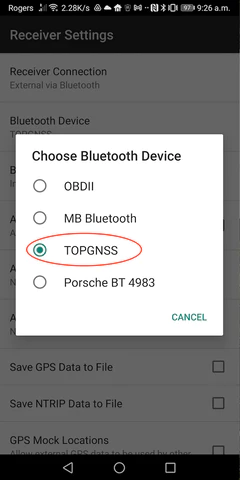
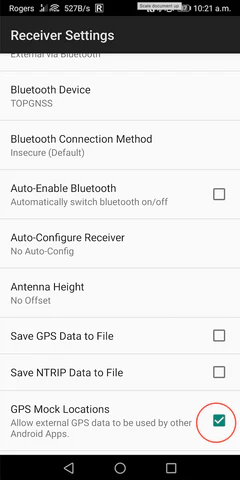
12. In the “Receiver Settings” menu, check “GPS Mock Locations”.
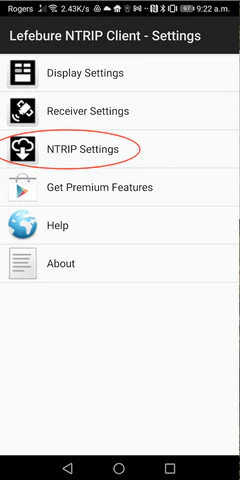
13. Navigate back one level in the menu, and you will find the “Lefebure NTRIP Client-Settings” menu. From there, select “NTRIP Settings”.
14. Select “Receiver Connection”.
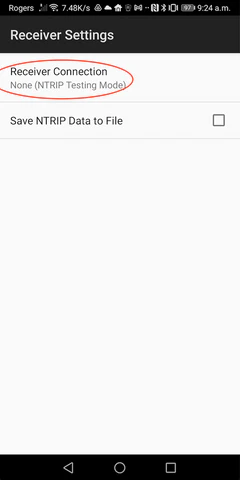
15. Select “NTRIP v1.0”.
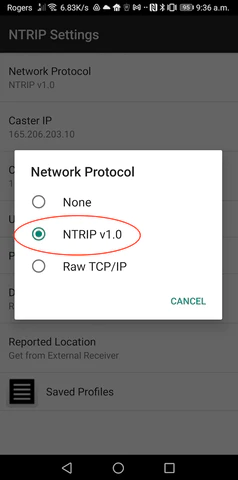
16. Key in the below settings:
- Caster IP: the NTRIP server / caster IP address / fully qualified domain name.
- Caster Port: the NTRIP server / Caster port number.
- Username: from your NTRIP service provider.
- Password: from your NTRIP service provider.
You can save these settings into a profile by select “Saved Profiles”
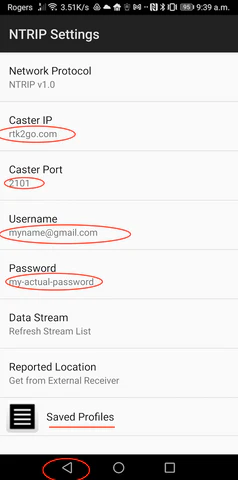
To proceed further, you will need a NTRIP caster login account. If you don’t have one yet, please obtain an account before proceeding. Here are some resources for NTRIP correction services where you can acquire an NTRIP account according to your preference.
- Rtk2go (free service, world wide coverage)
- UNAVCO (free service, US coverage)
- A List of Public RTK Base Stations in the U.S.
Section E:
Stream the NTRIP correction data to from NTRIP caster –> Android device –> RTK GNSS Receiver(TOP608BT). (step 17 – 20)
17. Once you have completed the previous steps, return to the main screen of the NTRIP Client app. From there, simply tap the “connect” button to establish the connection.
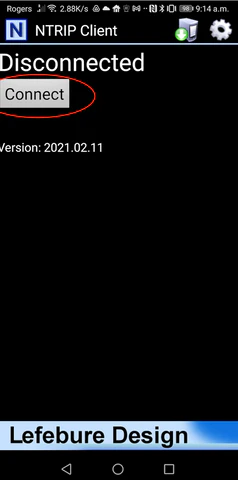
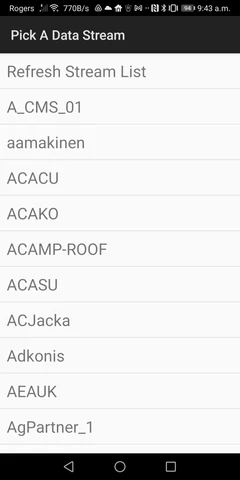
18. If the NTRIP configuration key is entered correctly, the NTRIP service provider will provide a stream list as shown below. Choose a mount point (stream) that is closest to your current location. You can obtain the list of mount points from your NTRIP service provider’s website.
19. On the NTRIP client main screen, you will notice a progress bar indicating the download of correction data (RTCM) from the NTRIP caster to the RTK GNSS receiver via your Android device.
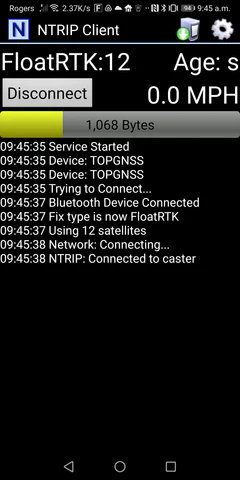
20. If your RTK GNSS receiver is located in an open sky area, you may observe a change in the Fix mode from “FloatRTK” to “RTK” within approximately one minute.
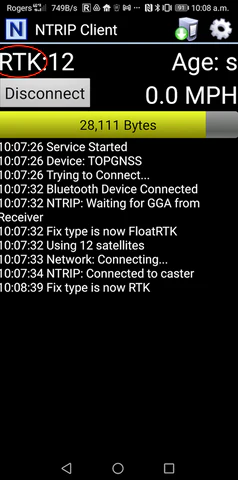
Congratulations! You have successfully set up your RTK GNSS receiver.
Demo 1:
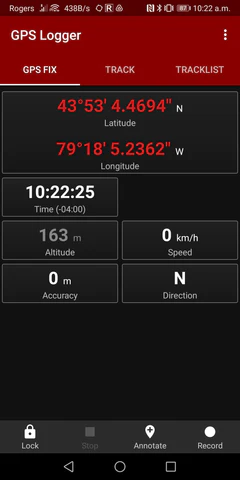
Stream the highly accurate location data from your RTK GNSS receiver to the “GPS logger” app on your Android device.
Demo 2:
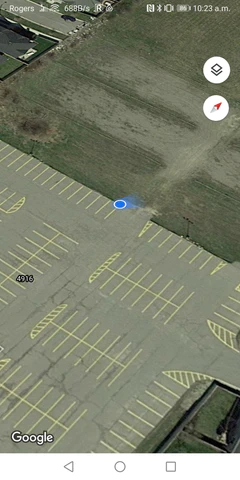
Stream the highly accurate location data from your RTK GNSS receiver to the “Google Maps” app on your Android device.
We have tested the below Bluetooth RTK GPS/GNSS receivers
work with this instruction.
They can be purchased from gpswebshop.com
Leave a Reply Cancel reply
You must be logged in to post a comment.
Blog Categories
- collapsCat options: Array ( [title] => Blog Categories [showPostCount] => 1 [inExclude] => exclude [inExcludeCats] => [showPosts] => 1 [showPages] => 0 [linkToCat] => 0 [olderThan] => 0 [excludeAll] => 0 [catSortOrder] => ASC [catSort] => catName [postSortOrder] => ASC [postSort] => postTitle [expand] => 0 [defaultExpand] => GPS / GNSS by OS, RTK GNSS, RTK Base Station, RTK Rover [debug] => 1 [postTitleLength] => 0 [catfeed] => none [taxonomy] => category [post_type] => post [postDateAppend] => after [postDateFormat] => m/d [showPostDate] => 1 [useCookies] => 1 [postsBeforeCats] => 1 [expandCatPost] => 1 [showEmptyCat] => 1 [showTopLevel] => 1 [useAjax] => 0 [customExpand] => [customCollapse] => [style] => kubrick [accordion] => 1 [title_link] => [addMisc] => 1 [addMiscTitle] => [number] => 2 [includeCatArray] => Array ( ) [expandSym] => ► [collapseSym] => ▼ ) postsToExclude: Array ( ) CATEGORY QUERY RESULTS Array ( [0] => WP_Term Object ( [term_id] => 35 [name] => GPS / GNSS by Android [slug] => gps-gnss-by-android [term_group] => 0 [term_taxonomy_id] => 35 [taxonomy] => category [description] => [parent] => 7 [count] => 7 [filter] => raw ) [1] => WP_Term Object ( [term_id] => 36 [name] => GPS / GNSS by IOS [slug] => gps-gnss-by-ios [term_group] => 0 [term_taxonomy_id] => 36 [taxonomy] => category [description] => [parent] => 7 [count] => 0 [filter] => raw ) [2] => WP_Term Object ( [term_id] => 37 [name] => GPS / GNSS by Linux [slug] => gps-gnss-by-linux [term_group] => 0 [term_taxonomy_id] => 37 [taxonomy] => category [description] => [parent] => 7 [count] => 2 [filter] => raw ) [3] => WP_Term Object ( [term_id] => 34 [name] => GPS / GNSS by MacOS [slug] => gps-gnss-by-macos [term_group] => 0 [term_taxonomy_id] => 34 [taxonomy] => category [description] => [parent] => 7 [count] => 0 [filter] => raw ) [4] => WP_Term Object ( [term_id] => 7 [name] => GPS / GNSS by OS [slug] => gps-gnss-by-os [term_group] => 0 [term_taxonomy_id] => 7 [taxonomy] => category [description] => Racing GNSS description [parent] => 0 [count] => 0 [filter] => raw ) [5] => WP_Term Object ( [term_id] => 33 [name] => GPS / GNSS by Windows [slug] => gps-gnss-by-windows [term_group] => 0 [term_taxonomy_id] => 33 [taxonomy] => category [description] => [parent] => 7 [count] => 7 [filter] => raw ) [6] => WP_Term Object ( [term_id] => 48 [name] => PPK [slug] => ppk-technology [term_group] => 0 [term_taxonomy_id] => 48 [taxonomy] => category [description] => PPK technology [parent] => 0 [count] => 3 [filter] => raw ) [7] => WP_Term Object ( [term_id] => 8 [name] => RTK Base Station [slug] => rtk-base-station [term_group] => 0 [term_taxonomy_id] => 8 [taxonomy] => category [description] => RTK Base Station desciption [parent] => 32 [count] => 4 [filter] => raw ) [8] => WP_Term Object ( [term_id] => 9 [name] => RTK Fix Base Station [slug] => rtk-fix-base-station [term_group] => 0 [term_taxonomy_id] => 9 [taxonomy] => category [description] => RTK Fix Base Station [parent] => 8 [count] => 9 [filter] => raw ) [9] => WP_Term Object ( [term_id] => 32 [name] => RTK GNSS [slug] => rtk-technology [term_group] => 0 [term_taxonomy_id] => 32 [taxonomy] => category [description] => Real-time kinematic (RTK) positioning technology [parent] => 0 [count] => 1 [filter] => raw ) [10] => WP_Term Object ( [term_id] => 13 [name] => RTK GNSS logger [slug] => rtk-gnss-logger [term_group] => 0 [term_taxonomy_id] => 13 [taxonomy] => category [description] => RTK GNSS logger desc [parent] => 12 [count] => 8 [filter] => raw ) [11] => WP_Term Object ( [term_id] => 14 [name] => RTK GNSS Receiver [slug] => rtk-gnss-receiver [term_group] => 0 [term_taxonomy_id] => 14 [taxonomy] => category [description] => RTK GNSS Receiver desc [parent] => 12 [count] => 13 [filter] => raw ) [12] => WP_Term Object ( [term_id] => 10 [name] => RTK Moving Base Station [slug] => rtk-moving-base-station [term_group] => 0 [term_taxonomy_id] => 10 [taxonomy] => category [description] => RTK Moving Base Station description [parent] => 8 [count] => 0 [filter] => raw ) [13] => WP_Term Object ( [term_id] => 11 [name] => RTK NTRIP [slug] => rtk-ntrip [term_group] => 0 [term_taxonomy_id] => 11 [taxonomy] => category [description] => RTK NTRIP desc [parent] => 32 [count] => 8 [filter] => raw ) [14] => WP_Term Object ( [term_id] => 42 [name] => RTK Portable Base Station [slug] => rtk-portable-base-station [term_group] => 0 [term_taxonomy_id] => 42 [taxonomy] => category [description] => RTK Portable Base Station Description [parent] => 8 [count] => 5 [filter] => raw ) [15] => WP_Term Object ( [term_id] => 12 [name] => RTK Rover [slug] => rtk-rover [term_group] => 0 [term_taxonomy_id] => 12 [taxonomy] => category [description] => [parent] => 32 [count] => 1 [filter] => raw ) [16] => WP_Term Object ( [term_id] => 46 [name] => RTK Software [slug] => rtk-software [term_group] => 0 [term_taxonomy_id] => 46 [taxonomy] => category [description] => RTK Software [parent] => 32 [count] => 3 [filter] => raw ) [17] => WP_Term Object ( [term_id] => 6 [name] => Sub-Meter GPS / GNSS [slug] => sub-meter-gps-gnss [term_group] => 0 [term_taxonomy_id] => 6 [taxonomy] => category [description] => [parent] => 0 [count] => 6 [filter] => raw ) [18] => WP_Term Object ( [term_id] => 1 [name] => Uncategorized [slug] => uncategorized [term_group] => 0 [term_taxonomy_id] => 1 [taxonomy] => category [description] => [parent] => 0 [count] => 0 [filter] => raw ) ) POST QUERY: select ID, slug, date(post_date) as date, post_status, post_type, post_date, post_author, post_title, post_name, name, object_id, t.term_id from wp_term_relationships AS tr, wp_posts AS p, wp_terms AS t, wp_term_taxonomy AS tt WHERE tt.term_id = t.term_id AND object_id=ID AND post_status='publish' AND tr.term_taxonomy_id = tt.term_taxonomy_id AND tt.taxonomy IN ('category') AND post_type='post' ORDER BY p.post_title ASC POST QUERY RESULTS Array ( [0] => stdClass Object ( [ID] => 1060 [slug] => rtk-software [date] => 2023-07-14 [post_status] => publish [post_type] => post [post_date] => 2023-07-14 17:37:05 [post_author] => 2 [post_title] => A Step-by-Step Guide for Downloading and Installing RTKLib [post_name] => a-step-by-step-guide-to-downloading-and-installing-rtklib [name] => RTK Software [object_id] => 1060 [term_id] => 46 ) [1] => stdClass Object ( [ID] => 1139 [slug] => rtk-fix-base-station [date] => 2024-02-25 [post_status] => publish [post_type] => post [post_date] => 2024-02-25 22:24:08 [post_author] => 2 [post_title] => Build your very own NTRIP RTK Base with just an RTK GNSS Receiver and 5 minutes [post_name] => build-your-very-own-ntrip-infrastructure-with-just-an-rtk-gnss-receiver-and-5-minutes [name] => RTK Fix Base Station [object_id] => 1139 [term_id] => 9 ) [2] => stdClass Object ( [ID] => 1139 [slug] => rtk-ntrip [date] => 2024-02-25 [post_status] => publish [post_type] => post [post_date] => 2024-02-25 22:24:08 [post_author] => 2 [post_title] => Build your very own NTRIP RTK Base with just an RTK GNSS Receiver and 5 minutes [post_name] => build-your-very-own-ntrip-infrastructure-with-just-an-rtk-gnss-receiver-and-5-minutes [name] => RTK NTRIP [object_id] => 1139 [term_id] => 11 ) [3] => stdClass Object ( [ID] => 1139 [slug] => rtk-portable-base-station [date] => 2024-02-25 [post_status] => publish [post_type] => post [post_date] => 2024-02-25 22:24:08 [post_author] => 2 [post_title] => Build your very own NTRIP RTK Base with just an RTK GNSS Receiver and 5 minutes [post_name] => build-your-very-own-ntrip-infrastructure-with-just-an-rtk-gnss-receiver-and-5-minutes [name] => RTK Portable Base Station [object_id] => 1139 [term_id] => 42 ) [4] => stdClass Object ( [ID] => 510 [slug] => rtk-ntrip [date] => 2021-10-18 [post_status] => publish [post_type] => post [post_date] => 2021-10-18 21:07:00 [post_author] => 2 [post_title] => Connecting a Bluetooth RTK GNSS Receiver to an NTRIP Mount Point via an Android Phone: A Step-by-Step Guide [post_name] => connecting-a-bluetooth-rtk-gnss-receiver-to-an-ntrip-mount-point-via-an-android-phone-a-step-by-step-guide [name] => RTK NTRIP [object_id] => 510 [term_id] => 11 ) [5] => stdClass Object ( [ID] => 510 [slug] => rtk-gnss-receiver [date] => 2021-10-18 [post_status] => publish [post_type] => post [post_date] => 2021-10-18 21:07:00 [post_author] => 2 [post_title] => Connecting a Bluetooth RTK GNSS Receiver to an NTRIP Mount Point via an Android Phone: A Step-by-Step Guide [post_name] => connecting-a-bluetooth-rtk-gnss-receiver-to-an-ntrip-mount-point-via-an-android-phone-a-step-by-step-guide [name] => RTK GNSS Receiver [object_id] => 510 [term_id] => 14 ) [6] => stdClass Object ( [ID] => 1444 [slug] => rtk-gnss-receiver [date] => 2024-02-25 [post_status] => publish [post_type] => post [post_date] => 2024-02-25 13:03:32 [post_author] => 2 [post_title] => Enabling GR-9029 High-Precision GNSS Data Sharing with Other Android Apps [post_name] => enabling-gr-9029-high-precision-gnss-data-sharing-with-other-android-apps [name] => RTK GNSS Receiver [object_id] => 1444 [term_id] => 14 ) [7] => stdClass Object ( [ID] => 1444 [slug] => gps-gnss-by-android [date] => 2024-02-25 [post_status] => publish [post_type] => post [post_date] => 2024-02-25 13:03:32 [post_author] => 2 [post_title] => Enabling GR-9029 High-Precision GNSS Data Sharing with Other Android Apps [post_name] => enabling-gr-9029-high-precision-gnss-data-sharing-with-other-android-apps [name] => GPS / GNSS by Android [object_id] => 1444 [term_id] => 35 ) [8] => stdClass Object ( [ID] => 1546 [slug] => rtk-gnss-receiver [date] => 2024-02-25 [post_status] => publish [post_type] => post [post_date] => 2024-02-25 13:03:17 [post_author] => 2 [post_title] => Enabling GR-903 High-Precision GNSS Data Sharing with Other Android Apps [post_name] => enabling-gr-903-high-precision-gnss-data-sharing-with-other-android-apps [name] => RTK GNSS Receiver [object_id] => 1546 [term_id] => 14 ) [9] => stdClass Object ( [ID] => 1546 [slug] => gps-gnss-by-android [date] => 2024-02-25 [post_status] => publish [post_type] => post [post_date] => 2024-02-25 13:03:17 [post_author] => 2 [post_title] => Enabling GR-903 High-Precision GNSS Data Sharing with Other Android Apps [post_name] => enabling-gr-903-high-precision-gnss-data-sharing-with-other-android-apps [name] => GPS / GNSS by Android [object_id] => 1546 [term_id] => 35 ) [10] => stdClass Object ( [ID] => 1633 [slug] => rtk-base-station [date] => 2024-01-24 [post_status] => publish [post_type] => post [post_date] => 2024-01-24 09:52:30 [post_author] => 2 [post_title] => Explanation of Fixed Position, Survey-in, PCO, and ARP in Navisys GR-9028 (or GR-903 Base) Settings. [post_name] => navisys-gr-9028-base-settings-explained [name] => RTK Base Station [object_id] => 1633 [term_id] => 8 ) [11] => stdClass Object ( [ID] => 1633 [slug] => rtk-fix-base-station [date] => 2024-01-24 [post_status] => publish [post_type] => post [post_date] => 2024-01-24 09:52:30 [post_author] => 2 [post_title] => Explanation of Fixed Position, Survey-in, PCO, and ARP in Navisys GR-9028 (or GR-903 Base) Settings. [post_name] => navisys-gr-9028-base-settings-explained [name] => RTK Fix Base Station [object_id] => 1633 [term_id] => 9 ) [12] => stdClass Object ( [ID] => 1633 [slug] => rtk-portable-base-station [date] => 2024-01-24 [post_status] => publish [post_type] => post [post_date] => 2024-01-24 09:52:30 [post_author] => 2 [post_title] => Explanation of Fixed Position, Survey-in, PCO, and ARP in Navisys GR-9028 (or GR-903 Base) Settings. [post_name] => navisys-gr-9028-base-settings-explained [name] => RTK Portable Base Station [object_id] => 1633 [term_id] => 42 ) [13] => stdClass Object ( [ID] => 1642 [slug] => rtk-gnss-logger [date] => 2024-01-24 [post_status] => publish [post_type] => post [post_date] => 2024-01-24 09:52:37 [post_author] => 2 [post_title] => Explanation of Geodesic distance, Ground distance, PCO & APR in Navisys GR-9029 (or GR-903 Rover) Settings. [post_name] => navisys-gr-9029-rover-settings-explained [name] => RTK GNSS logger [object_id] => 1642 [term_id] => 13 ) [14] => stdClass Object ( [ID] => 1642 [slug] => rtk-gnss-receiver [date] => 2024-01-24 [post_status] => publish [post_type] => post [post_date] => 2024-01-24 09:52:37 [post_author] => 2 [post_title] => Explanation of Geodesic distance, Ground distance, PCO & APR in Navisys GR-9029 (or GR-903 Rover) Settings. [post_name] => navisys-gr-9029-rover-settings-explained [name] => RTK GNSS Receiver [object_id] => 1642 [term_id] => 14 ) [15] => stdClass Object ( [ID] => 681 [slug] => sub-meter-gps-gnss [date] => 2021-10-20 [post_status] => publish [post_type] => post [post_date] => 2021-10-20 11:00:00 [post_author] => 2 [post_title] => Exploring the 5Hz Logging Mode on the Columbus P-10 Pro [post_name] => exploring-the-5hz-logging-mode-on-the-columbus-p-10-pro [name] => Sub-Meter GPS / GNSS [object_id] => 681 [term_id] => 6 ) [16] => stdClass Object ( [ID] => 1330 [slug] => rtk-gnss-logger [date] => 2023-12-14 [post_status] => publish [post_type] => post [post_date] => 2023-12-14 21:28:53 [post_author] => 2 [post_title] => High-Precision Waypoint Collecting Using Navisys GR-9029 RTK GNSS [post_name] => collect-waypoints-with-centimeter-level-accuracy-using-navisys-gr-9029 [name] => RTK GNSS logger [object_id] => 1330 [term_id] => 13 ) [17] => stdClass Object ( [ID] => 1631 [slug] => rtk-base-station [date] => 2024-05-24 [post_status] => publish [post_type] => post [post_date] => 2024-05-24 09:52:42 [post_author] => 2 [post_title] => How accurate does your RTK base need to be? [post_name] => rtk-base-accuracy-fixed-position-vs-survey-in-methods-explained [name] => RTK Base Station [object_id] => 1631 [term_id] => 8 ) [18] => stdClass Object ( [ID] => 1933 [slug] => rtk-fix-base-station [date] => 2024-08-30 [post_status] => publish [post_type] => post [post_date] => 2024-08-30 13:55:32 [post_author] => 2 [post_title] => How to configure the Columbus EX-1 as an RTK/PPK Base Station in a Production Environment [post_name] => how-to-configure-the-columbus-ex-1-as-an-rtk-ppk-base-station-in-a-production-environment [name] => RTK Fix Base Station [object_id] => 1933 [term_id] => 9 ) [19] => stdClass Object ( [ID] => 1933 [slug] => rtk-portable-base-station [date] => 2024-08-30 [post_status] => publish [post_type] => post [post_date] => 2024-08-30 13:55:32 [post_author] => 2 [post_title] => How to configure the Columbus EX-1 as an RTK/PPK Base Station in a Production Environment [post_name] => how-to-configure-the-columbus-ex-1-as-an-rtk-ppk-base-station-in-a-production-environment [name] => RTK Portable Base Station [object_id] => 1933 [term_id] => 42 ) [20] => stdClass Object ( [ID] => 1933 [slug] => ppk-technology [date] => 2024-08-30 [post_status] => publish [post_type] => post [post_date] => 2024-08-30 13:55:32 [post_author] => 2 [post_title] => How to configure the Columbus EX-1 as an RTK/PPK Base Station in a Production Environment [post_name] => how-to-configure-the-columbus-ex-1-as-an-rtk-ppk-base-station-in-a-production-environment [name] => PPK [object_id] => 1933 [term_id] => 48 ) [21] => stdClass Object ( [ID] => 729 [slug] => gps-gnss-by-windows [date] => 2021-06-25 [post_status] => publish [post_type] => post [post_date] => 2021-06-25 10:33:00 [post_author] => 2 [post_title] => How to confirm your ublox GNSS receiver is installed correctly for Windows Sensor API and location API? [post_name] => how-to-confirm-your-ublox-gnss-receiver-is-installed-correctly-for-windows-sensor-api-and-location-api [name] => GPS / GNSS by Windows [object_id] => 729 [term_id] => 33 ) [22] => stdClass Object ( [ID] => 23 [slug] => gps-gnss-by-android [date] => 2021-05-09 [post_status] => publish [post_type] => post [post_date] => 2021-05-09 15:23:00 [post_author] => 2 [post_title] => How to connect a Bluetooth GPS Receiver with an Android Device? [post_name] => how-to-connect-a-bluetooth-gps-receiver-with-an-android-device [name] => GPS / GNSS by Android [object_id] => 23 [term_id] => 35 ) [23] => stdClass Object ( [ID] => 15 [slug] => sub-meter-gps-gnss [date] => 2022-11-27 [post_status] => publish [post_type] => post [post_date] => 2022-11-27 15:18:00 [post_author] => 2 [post_title] => How to connect a GNSS Receiver to Windows Maps (or Windows Location Service)? [post_name] => how-to-connect-a-gnss-receiver-to-windows-maps-or-windows-location-service [name] => Sub-Meter GPS / GNSS [object_id] => 15 [term_id] => 6 ) [24] => stdClass Object ( [ID] => 15 [slug] => rtk-gnss-receiver [date] => 2022-11-27 [post_status] => publish [post_type] => post [post_date] => 2022-11-27 15:18:00 [post_author] => 2 [post_title] => How to connect a GNSS Receiver to Windows Maps (or Windows Location Service)? [post_name] => how-to-connect-a-gnss-receiver-to-windows-maps-or-windows-location-service [name] => RTK GNSS Receiver [object_id] => 15 [term_id] => 14 ) [25] => stdClass Object ( [ID] => 15 [slug] => gps-gnss-by-windows [date] => 2022-11-27 [post_status] => publish [post_type] => post [post_date] => 2022-11-27 15:18:00 [post_author] => 2 [post_title] => How to connect a GNSS Receiver to Windows Maps (or Windows Location Service)? [post_name] => how-to-connect-a-gnss-receiver-to-windows-maps-or-windows-location-service [name] => GPS / GNSS by Windows [object_id] => 15 [term_id] => 33 ) [26] => stdClass Object ( [ID] => 19 [slug] => gps-gnss-by-windows [date] => 2022-05-04 [post_status] => publish [post_type] => post [post_date] => 2022-05-04 15:21:00 [post_author] => 2 [post_title] => How to connect a GPS/GNSS Receiver to Google Earth on Windows? [post_name] => how-to-connect-a-gps-gnss-receiver-to-google-earth-on-windows [name] => GPS / GNSS by Windows [object_id] => 19 [term_id] => 33 ) [27] => stdClass Object ( [ID] => 508 [slug] => rtk-gnss-receiver [date] => 2021-10-20 [post_status] => publish [post_type] => post [post_date] => 2021-10-20 21:12:00 [post_author] => 2 [post_title] => How to Connect a USB/Bluetooth RTK GNSS Receiver to Windows? (Accessing NTRIP Through an Android Phone's Internet Connection) [post_name] => how-to-connect-a-usb-bluetooth-rtk-gnss-receiver-to-windows-accessing-ntrip-through-an-android-phones-internet-connection [name] => RTK GNSS Receiver [object_id] => 508 [term_id] => 14 ) [28] => stdClass Object ( [ID] => 508 [slug] => gps-gnss-by-windows [date] => 2021-10-20 [post_status] => publish [post_type] => post [post_date] => 2021-10-20 21:12:00 [post_author] => 2 [post_title] => How to Connect a USB/Bluetooth RTK GNSS Receiver to Windows? (Accessing NTRIP Through an Android Phone's Internet Connection) [post_name] => how-to-connect-a-usb-bluetooth-rtk-gnss-receiver-to-windows-accessing-ntrip-through-an-android-phones-internet-connection [name] => GPS / GNSS by Windows [object_id] => 508 [term_id] => 33 ) [29] => stdClass Object ( [ID] => 21 [slug] => gps-gnss-by-linux [date] => 2021-06-13 [post_status] => publish [post_type] => post [post_date] => 2021-06-13 15:22:00 [post_author] => 2 [post_title] => How to connect an usb GPS receiver to a Linux computer? [post_name] => how-to-connect-an-usb-gps-receiver-to-a-linux-computer [name] => GPS / GNSS by Linux [object_id] => 21 [term_id] => 37 ) [30] => stdClass Object ( [ID] => 713 [slug] => gps-gnss-by-linux [date] => 2021-06-14 [post_status] => publish [post_type] => post [post_date] => 2021-06-14 10:10:00 [post_author] => 2 [post_title] => How to connect an usb GPS receiver with a Raspberry PI? [post_name] => how-to-connect-an-usb-gps-receiver-with-a-raspberry-pi [name] => GPS / GNSS by Linux [object_id] => 713 [term_id] => 37 ) [31] => stdClass Object ( [ID] => 355 [slug] => gps-gnss-by-android [date] => 2021-05-17 [post_status] => publish [post_type] => post [post_date] => 2021-05-17 14:34:00 [post_author] => 2 [post_title] => How to connect an USB GPS receiver with an Android Device? [post_name] => how-to-connect-an-usb-gps-receiver-with-an-android-device [name] => GPS / GNSS by Android [object_id] => 355 [term_id] => 35 ) [32] => stdClass Object ( [ID] => 17 [slug] => gps-gnss-by-windows [date] => 2021-04-18 [post_status] => publish [post_type] => post [post_date] => 2021-04-18 15:20:00 [post_author] => 2 [post_title] => How to connect GNSS200L / GNSS100L USB GNSS Receiver to Windows Maps (or Windows Location Service)? [post_name] => how-to-connect-gnss200l-gnss100l-usb-gnss-receiver-to-windows-maps-or-windows-location-service [name] => GPS / GNSS by Windows [object_id] => 17 [term_id] => 33 ) [33] => stdClass Object ( [ID] => 689 [slug] => sub-meter-gps-gnss [date] => 2019-06-24 [post_status] => publish [post_type] => post [post_date] => 2019-06-24 15:32:00 [post_author] => 2 [post_title] => How to enable SBAS for Columbus P-7 Pro? [post_name] => how-to-enable-sbas-for-columbus-p-7-pro [name] => Sub-Meter GPS / GNSS [object_id] => 689 [term_id] => 6 ) [34] => stdClass Object ( [ID] => 393 [slug] => rtk-fix-base-station [date] => 2024-02-25 [post_status] => publish [post_type] => post [post_date] => 2024-02-25 13:06:00 [post_author] => 2 [post_title] => How to obtain a highly accurate coordinate for your RTK base station using PPP method? [post_name] => how-to-obtain-a-highly-accurate-coordinate-for-your-rtk-base-station [name] => RTK Fix Base Station [object_id] => 393 [term_id] => 9 ) [35] => stdClass Object ( [ID] => 410 [slug] => rtk-ntrip [date] => 2022-12-25 [post_status] => publish [post_type] => post [post_date] => 2022-12-25 21:33:00 [post_author] => 2 [post_title] => How to set up a free internet NTRIP caster mount point? [post_name] => how-to-set-up-a-free-internet-ntrip-caster-mount-point [name] => RTK NTRIP [object_id] => 410 [term_id] => 11 ) [36] => stdClass Object ( [ID] => 369 [slug] => rtk-fix-base-station [date] => 2022-12-24 [post_status] => publish [post_type] => post [post_date] => 2022-12-24 18:16:00 [post_author] => 2 [post_title] => How to setup an RTK Base station using a USB / Bluetooth RTK GNSS Receiver? [post_name] => how-to-setup-an-rtk-base-station-using-a-rtk-gnss-receiver [name] => RTK Fix Base Station [object_id] => 369 [term_id] => 9 ) [37] => stdClass Object ( [ID] => 438 [slug] => rtk-gnss-receiver [date] => 2021-10-18 [post_status] => publish [post_type] => post [post_date] => 2021-10-18 10:28:00 [post_author] => 2 [post_title] => How to use a RTK GNSS Receiver for Android: A Step-by-Step Guide [post_name] => how-to-use-a-rtk-gnss-receiver-for-android-a-step-by-step-guide [name] => RTK GNSS Receiver [object_id] => 438 [term_id] => 14 ) [38] => stdClass Object ( [ID] => 438 [slug] => gps-gnss-by-android [date] => 2021-10-18 [post_status] => publish [post_type] => post [post_date] => 2021-10-18 10:28:00 [post_author] => 2 [post_title] => How to use a RTK GNSS Receiver for Android: A Step-by-Step Guide [post_name] => how-to-use-a-rtk-gnss-receiver-for-android-a-step-by-step-guide [name] => GPS / GNSS by Android [object_id] => 438 [term_id] => 35 ) [39] => stdClass Object ( [ID] => 1581 [slug] => rtk-base-station [date] => 2024-02-24 [post_status] => publish [post_type] => post [post_date] => 2024-02-24 23:23:52 [post_author] => 2 [post_title] => Navisys GR-903, GR-9028, and GR-9029 side-by-side comparison table [post_name] => navisys-gr-903-gr-9028-and-gr-9029-side-by-side-comparison-table [name] => RTK Base Station [object_id] => 1581 [term_id] => 8 ) [40] => stdClass Object ( [ID] => 1581 [slug] => rtk-gnss-logger [date] => 2024-02-24 [post_status] => publish [post_type] => post [post_date] => 2024-02-24 23:23:52 [post_author] => 2 [post_title] => Navisys GR-903, GR-9028, and GR-9029 side-by-side comparison table [post_name] => navisys-gr-903-gr-9028-and-gr-9029-side-by-side-comparison-table [name] => RTK GNSS logger [object_id] => 1581 [term_id] => 13 ) [41] => stdClass Object ( [ID] => 1581 [slug] => rtk-gnss-receiver [date] => 2024-02-24 [post_status] => publish [post_type] => post [post_date] => 2024-02-24 23:23:52 [post_author] => 2 [post_title] => Navisys GR-903, GR-9028, and GR-9029 side-by-side comparison table [post_name] => navisys-gr-903-gr-9028-and-gr-9029-side-by-side-comparison-table [name] => RTK GNSS Receiver [object_id] => 1581 [term_id] => 14 ) [42] => stdClass Object ( [ID] => 901 [slug] => rtk-ntrip [date] => 2023-11-10 [post_status] => publish [post_type] => post [post_date] => 2023-11-10 09:30:40 [post_author] => 2 [post_title] => NTRIP Casters in the Real World [post_name] => ntrip-casters-in-the-current-real-world [name] => RTK NTRIP [object_id] => 901 [term_id] => 11 ) [43] => stdClass Object ( [ID] => 886 [slug] => rtk-technology [date] => 2023-11-25 [post_status] => publish [post_type] => post [post_date] => 2023-11-25 11:00:31 [post_author] => 2 [post_title] => NTRIP RTK products buyers' guide [post_name] => ntrip-rtk-products-buyers-guide [name] => RTK GNSS [object_id] => 886 [term_id] => 32 ) [44] => stdClass Object ( [ID] => 1855 [slug] => ppk-technology [date] => 2024-08-27 [post_status] => publish [post_type] => post [post_date] => 2024-08-27 22:04:50 [post_author] => 2 [post_title] => PPK (Post-Processed Kinematic) by using the Columbus EX-1 GNSS Data Logger [post_name] => ppk-post-processed-kinematic-by-using-the-columbus-ex-1-gnss-data-logger [name] => PPK [object_id] => 1855 [term_id] => 48 ) [45] => stdClass Object ( [ID] => 2007 [slug] => rtk-fix-base-station [date] => 2024-02-25 [post_status] => publish [post_type] => post [post_date] => 2024-02-25 13:07:49 [post_author] => 2 [post_title] => RTK / PPK Base Station Accuracy: Long-Duration Survey-In vs. PPP (Precise Point Positioning) [post_name] => rtk-ppk-base-station-accuracy-long-duration-survey-in-vs-ppp-precise-point-positioning [name] => RTK Fix Base Station [object_id] => 2007 [term_id] => 9 ) [46] => stdClass Object ( [ID] => 2007 [slug] => ppk-technology [date] => 2024-02-25 [post_status] => publish [post_type] => post [post_date] => 2024-02-25 13:07:49 [post_author] => 2 [post_title] => RTK / PPK Base Station Accuracy: Long-Duration Survey-In vs. PPP (Precise Point Positioning) [post_name] => rtk-ppk-base-station-accuracy-long-duration-survey-in-vs-ppp-precise-point-positioning [name] => PPK [object_id] => 2007 [term_id] => 48 ) [47] => stdClass Object ( [ID] => 1117 [slug] => rtk-ntrip [date] => 2023-08-26 [post_status] => publish [post_type] => post [post_date] => 2023-08-26 16:31:45 [post_author] => 2 [post_title] => Setting Up a Free NTRIP client with RTKLib’s STRSVR [post_name] => setting-up-a-free-ntrip-client-with-rtklibs-strsvr [name] => RTK NTRIP [object_id] => 1117 [term_id] => 11 ) [48] => stdClass Object ( [ID] => 1117 [slug] => rtk-gnss-receiver [date] => 2023-08-26 [post_status] => publish [post_type] => post [post_date] => 2023-08-26 16:31:45 [post_author] => 2 [post_title] => Setting Up a Free NTRIP client with RTKLib’s STRSVR [post_name] => setting-up-a-free-ntrip-client-with-rtklibs-strsvr [name] => RTK GNSS Receiver [object_id] => 1117 [term_id] => 14 ) [49] => stdClass Object ( [ID] => 1117 [slug] => rtk-software [date] => 2023-08-26 [post_status] => publish [post_type] => post [post_date] => 2023-08-26 16:31:45 [post_author] => 2 [post_title] => Setting Up a Free NTRIP client with RTKLib’s STRSVR [post_name] => setting-up-a-free-ntrip-client-with-rtklibs-strsvr [name] => RTK Software [object_id] => 1117 [term_id] => 46 ) [50] => stdClass Object ( [ID] => 1075 [slug] => rtk-fix-base-station [date] => 2023-11-26 [post_status] => publish [post_type] => post [post_date] => 2023-11-26 14:54:02 [post_author] => 2 [post_title] => Setting Up a Free NTRIP Server with RTKLib's STRSVR [post_name] => setting-up-a-free-ntrip-server-with-rtklibs-strsvr [name] => RTK Fix Base Station [object_id] => 1075 [term_id] => 9 ) [51] => stdClass Object ( [ID] => 1075 [slug] => rtk-ntrip [date] => 2023-11-26 [post_status] => publish [post_type] => post [post_date] => 2023-11-26 14:54:02 [post_author] => 2 [post_title] => Setting Up a Free NTRIP Server with RTKLib's STRSVR [post_name] => setting-up-a-free-ntrip-server-with-rtklibs-strsvr [name] => RTK NTRIP [object_id] => 1075 [term_id] => 11 ) [52] => stdClass Object ( [ID] => 1075 [slug] => rtk-software [date] => 2023-11-26 [post_status] => publish [post_type] => post [post_date] => 2023-11-26 14:54:02 [post_author] => 2 [post_title] => Setting Up a Free NTRIP Server with RTKLib's STRSVR [post_name] => setting-up-a-free-ntrip-server-with-rtklibs-strsvr [name] => RTK Software [object_id] => 1075 [term_id] => 46 ) [53] => stdClass Object ( [ID] => 1220 [slug] => rtk-base-station [date] => 2023-11-09 [post_status] => publish [post_type] => post [post_date] => 2023-11-09 23:58:46 [post_author] => 2 [post_title] => Setting Up the ByNav C2-M2X RTK GNSS Module as Either an RTK Base or Rover [post_name] => setting-up-the-bynav-c2-m2x-rtk-gnss-module-as-either-an-rtk-base-or-rover [name] => RTK Base Station [object_id] => 1220 [term_id] => 8 ) [54] => stdClass Object ( [ID] => 1220 [slug] => rtk-fix-base-station [date] => 2023-11-09 [post_status] => publish [post_type] => post [post_date] => 2023-11-09 23:58:46 [post_author] => 2 [post_title] => Setting Up the ByNav C2-M2X RTK GNSS Module as Either an RTK Base or Rover [post_name] => setting-up-the-bynav-c2-m2x-rtk-gnss-module-as-either-an-rtk-base-or-rover [name] => RTK Fix Base Station [object_id] => 1220 [term_id] => 9 ) [55] => stdClass Object ( [ID] => 1220 [slug] => rtk-rover [date] => 2023-11-09 [post_status] => publish [post_type] => post [post_date] => 2023-11-09 23:58:46 [post_author] => 2 [post_title] => Setting Up the ByNav C2-M2X RTK GNSS Module as Either an RTK Base or Rover [post_name] => setting-up-the-bynav-c2-m2x-rtk-gnss-module-as-either-an-rtk-base-or-rover [name] => RTK Rover [object_id] => 1220 [term_id] => 12 ) [56] => stdClass Object ( [ID] => 1220 [slug] => rtk-gnss-receiver [date] => 2023-11-09 [post_status] => publish [post_type] => post [post_date] => 2023-11-09 23:58:46 [post_author] => 2 [post_title] => Setting Up the ByNav C2-M2X RTK GNSS Module as Either an RTK Base or Rover [post_name] => setting-up-the-bynav-c2-m2x-rtk-gnss-module-as-either-an-rtk-base-or-rover [name] => RTK GNSS Receiver [object_id] => 1220 [term_id] => 14 ) [57] => stdClass Object ( [ID] => 1361 [slug] => rtk-gnss-logger [date] => 2023-12-15 [post_status] => publish [post_type] => post [post_date] => 2023-12-15 11:43:42 [post_author] => 2 [post_title] => Stakeouts with Navisys GR-9029 RTK GNSS [post_name] => stakeouts-with-the-navisys-gr-9029-rtk-gnss [name] => RTK GNSS logger [object_id] => 1361 [term_id] => 13 ) [58] => stdClass Object ( [ID] => 1134 [slug] => rtk-ntrip [date] => 2023-11-27 [post_status] => publish [post_type] => post [post_date] => 2023-11-27 17:35:51 [post_author] => 2 [post_title] => The Free NTRIP Caster from GPSWebShop / CanadaGPS [post_name] => the-free-ntrip-caster-from-gpswebshop [name] => RTK NTRIP [object_id] => 1134 [term_id] => 11 ) [59] => stdClass Object ( [ID] => 687 [slug] => sub-meter-gps-gnss [date] => 2019-06-24 [post_status] => publish [post_type] => post [post_date] => 2019-06-24 15:10:00 [post_author] => 2 [post_title] => The most detailed explanation of P-10 Pro accuracy. [post_name] => the-most-detailed-explanation-of-p-10-pro-accuracy [name] => Sub-Meter GPS / GNSS [object_id] => 687 [term_id] => 6 ) [60] => stdClass Object ( [ID] => 700 [slug] => sub-meter-gps-gnss [date] => 2022-08-24 [post_status] => publish [post_type] => post [post_date] => 2022-08-24 15:59:00 [post_author] => 2 [post_title] => The static drift filter of Columbus P-7 Pro. [post_name] => the-static-drift-filter-of-columbus-p-7-pro [name] => Sub-Meter GPS / GNSS [object_id] => 700 [term_id] => 6 ) [61] => stdClass Object ( [ID] => 555 [slug] => gps-gnss-by-windows [date] => 2021-10-18 [post_status] => publish [post_type] => post [post_date] => 2021-10-18 14:32:00 [post_author] => 2 [post_title] => Uninstall "Windows Location Sensor": A Step-by-Step Guide [post_name] => uninstall-windows-location-sensor-a-step-by-step-guide [name] => GPS / GNSS by Windows [object_id] => 555 [term_id] => 33 ) [62] => stdClass Object ( [ID] => 854 [slug] => rtk-ntrip [date] => 2023-08-09 [post_status] => publish [post_type] => post [post_date] => 2023-08-09 09:59:29 [post_author] => 2 [post_title] => User Guide - Setting Up GR-9028 Portable RTK Base (with Android phone or tablet) [post_name] => instructions-for-setting-up-gr-9028-portable-rtk-base-with-android-phone-or-tablet [name] => RTK NTRIP [object_id] => 854 [term_id] => 11 ) [63] => stdClass Object ( [ID] => 811 [slug] => rtk-portable-base-station [date] => 2023-08-08 [post_status] => publish [post_type] => post [post_date] => 2023-08-08 13:25:46 [post_author] => 2 [post_title] => User Guide - Setting Up GR-9028 Portable RTK Base (with iPhone/iPad) [post_name] => instructions-for-setting-up-gr-9028-portable-rtk-base-with-iphone-ipad [name] => RTK Portable Base Station [object_id] => 811 [term_id] => 42 ) [64] => stdClass Object ( [ID] => 984 [slug] => rtk-gnss-logger [date] => 2023-08-08 [post_status] => publish [post_type] => post [post_date] => 2023-08-08 19:36:56 [post_author] => 2 [post_title] => User Guide - Setting Up GR-9029 RTK GNSS Data Logger (with Android phone or tablet) [post_name] => user-guide-setting-up-gr-9029-rtk-gnss-data-logger-with-android-phone-or-tablet [name] => RTK GNSS logger [object_id] => 984 [term_id] => 13 ) [65] => stdClass Object ( [ID] => 954 [slug] => rtk-gnss-logger [date] => 2023-08-09 [post_status] => publish [post_type] => post [post_date] => 2023-08-09 16:09:23 [post_author] => 2 [post_title] => User Guide - Setting Up GR-9029 RTK GNSS Data Logger (with iPhone/iPad) [post_name] => user-guide-setting-up-gr-9029-rtk-gnss-data-logger-with-iphone-ipad [name] => RTK GNSS logger [object_id] => 954 [term_id] => 13 ) [66] => stdClass Object ( [ID] => 1508 [slug] => rtk-gnss-logger [date] => 2024-02-25 [post_status] => publish [post_type] => post [post_date] => 2024-02-25 13:02:43 [post_author] => 2 [post_title] => User Guide – How to Set Up GR-903 as a RTK GNSS Data logger Using the "SPPRTK" Android App? [post_name] => user-guide-how-to-set-up-gr-903-as-a-rtk-gnss-data-logger-using-the-spprtk-android-app [name] => RTK GNSS logger [object_id] => 1508 [term_id] => 13 ) [67] => stdClass Object ( [ID] => 1508 [slug] => gps-gnss-by-android [date] => 2024-02-25 [post_status] => publish [post_type] => post [post_date] => 2024-02-25 13:02:43 [post_author] => 2 [post_title] => User Guide – How to Set Up GR-903 as a RTK GNSS Data logger Using the "SPPRTK" Android App? [post_name] => user-guide-how-to-set-up-gr-903-as-a-rtk-gnss-data-logger-using-the-spprtk-android-app [name] => GPS / GNSS by Android [object_id] => 1508 [term_id] => 35 ) [68] => stdClass Object ( [ID] => 1463 [slug] => rtk-fix-base-station [date] => 2024-02-25 [post_status] => publish [post_type] => post [post_date] => 2024-02-25 13:08:19 [post_author] => 2 [post_title] => User Guide – How to Set Up GR-903 as RTK Base Station and NTRIP Server Using the "SPPRTK" Android App? [post_name] => user-guide-how-to-set-up-gr-903-as-rtk-base-station-and-ntrip-server-using-the-spprtk-android-app [name] => RTK Fix Base Station [object_id] => 1463 [term_id] => 9 ) [69] => stdClass Object ( [ID] => 1463 [slug] => gps-gnss-by-android [date] => 2024-02-25 [post_status] => publish [post_type] => post [post_date] => 2024-02-25 13:08:19 [post_author] => 2 [post_title] => User Guide – How to Set Up GR-903 as RTK Base Station and NTRIP Server Using the "SPPRTK" Android App? [post_name] => user-guide-how-to-set-up-gr-903-as-rtk-base-station-and-ntrip-server-using-the-spprtk-android-app [name] => GPS / GNSS by Android [object_id] => 1463 [term_id] => 35 ) [70] => stdClass Object ( [ID] => 1463 [slug] => rtk-portable-base-station [date] => 2024-02-25 [post_status] => publish [post_type] => post [post_date] => 2024-02-25 13:08:19 [post_author] => 2 [post_title] => User Guide – How to Set Up GR-903 as RTK Base Station and NTRIP Server Using the "SPPRTK" Android App? [post_name] => user-guide-how-to-set-up-gr-903-as-rtk-base-station-and-ntrip-server-using-the-spprtk-android-app [name] => RTK Portable Base Station [object_id] => 1463 [term_id] => 42 ) [71] => stdClass Object ( [ID] => 537 [slug] => rtk-gnss-receiver [date] => 2021-10-18 [post_status] => publish [post_type] => post [post_date] => 2021-10-18 13:17:00 [post_author] => 2 [post_title] => Utilizing a RTK GNSS Receiver for Linux: A Step-by-Step Guide [post_name] => utilizing-a-rtk-gnss-receiver-for-linux-a-step-by-step-guide [name] => RTK GNSS Receiver [object_id] => 537 [term_id] => 14 ) [72] => stdClass Object ( [ID] => 550 [slug] => rtk-gnss-logger [date] => 2020-10-18 [post_status] => publish [post_type] => post [post_date] => 2020-10-18 14:00:00 [post_author] => 2 [post_title] => Utilizing a USB/Bluetooth RTK GNSS Receiver for High Accuracy Data Logging: A Step-by-Step Guide [post_name] => utilizing-a-usb-bluetooth-rtk-gnss-receiver-for-high-accuracy-data-logging-a-step-by-step-guide [name] => RTK GNSS logger [object_id] => 550 [term_id] => 13 ) [73] => stdClass Object ( [ID] => 550 [slug] => rtk-gnss-receiver [date] => 2020-10-18 [post_status] => publish [post_type] => post [post_date] => 2020-10-18 14:00:00 [post_author] => 2 [post_title] => Utilizing a USB/Bluetooth RTK GNSS Receiver for High Accuracy Data Logging: A Step-by-Step Guide [post_name] => utilizing-a-usb-bluetooth-rtk-gnss-receiver-for-high-accuracy-data-logging-a-step-by-step-guide [name] => RTK GNSS Receiver [object_id] => 550 [term_id] => 14 ) [74] => stdClass Object ( [ID] => 488 [slug] => rtk-gnss-receiver [date] => 2021-10-20 [post_status] => publish [post_type] => post [post_date] => 2021-10-20 11:38:00 [post_author] => 2 [post_title] => Utilizing a USB/Bluetooth RTK GNSS Receiver with a Windows 10/11 Laptop: A Step-by-Step Guide [post_name] => utilizing-a-usb-bluetooth-rtk-gnss-receiver-with-a-windows-10-11-laptop-a-step-by-step-guide [name] => RTK GNSS Receiver [object_id] => 488 [term_id] => 14 ) [75] => stdClass Object ( [ID] => 488 [slug] => gps-gnss-by-windows [date] => 2021-10-20 [post_status] => publish [post_type] => post [post_date] => 2021-10-20 11:38:00 [post_author] => 2 [post_title] => Utilizing a USB/Bluetooth RTK GNSS Receiver with a Windows 10/11 Laptop: A Step-by-Step Guide [post_name] => utilizing-a-usb-bluetooth-rtk-gnss-receiver-with-a-windows-10-11-laptop-a-step-by-step-guide [name] => GPS / GNSS by Windows [object_id] => 488 [term_id] => 33 ) [76] => stdClass Object ( [ID] => 1710 [slug] => sub-meter-gps-gnss [date] => 2024-08-01 [post_status] => publish [post_type] => post [post_date] => 2024-08-01 11:05:36 [post_author] => 2 [post_title] => Why can’t you rely on some GPS/GNSS apps’ accuracy readings for multi-frequency GNSS Receivers? [post_name] => why-cant-you-rely-on-some-gps-gnss-apps-accuracy-readings-for-multi-frequency-gnss-receivers [name] => Sub-Meter GPS / GNSS [object_id] => 1710 [term_id] => 6 ) )
- ▼ GPS / GNSS by OS (16)
- Enabling GR-9029 High-Precision GNSS Data Sharing with Other Android Apps 02/25
- Enabling GR-903 High-Precision GNSS Data Sharing with Other Android Apps 02/25
- How to connect a Bluetooth GPS Receiver with an Android Device? 05/09
- How to connect an USB GPS receiver with an Android Device? 05/17
- How to use a RTK GNSS Receiver for Android: A Step-by-Step Guide 10/18
- User Guide – How to Set Up GR-903 as a RTK GNSS Data logger Using the "SPPRTK" Android App? 02/25
- User Guide – How to Set Up GR-903 as RTK Base Station and NTRIP Server Using the "SPPRTK" Android App? 02/25


